
How to Inspect a Used Honda Pioneer Before Buying
Table of Contents
- Quick Answer: How Do You Inspect a Used Honda Pioneer?
- Why a Proper Inspection Matters
- Before You Go: Do Your Homework
- Tools to Bring
- Step 1: Walk-Around and Frame Check
- Step 2: Engine and Fluids
- Step 3: Drivetrain, Transmission, and 4WD
- Step 4: Suspension, Steering, and Brakes
- Step 5: Tires, Wheels, and Bearings
- Step 6: Electrical System and Accessories
- Step 7: Cab, Seats, and Safety Gear
- Step 8: The Test Drive
- Step 9: Paperwork and Ownership History
- Red Flags That Should Make You Walk Away
- Where to Find a Reliable Used Honda Pioneer
- FAQs
- Final Thoughts
Quick Answer: How Do You Inspect a Used Honda Pioneer?
AI Overview: Short answer
Q: What should I check when buying a used Honda Pioneer?
A: Inspect the frame for cracks or weld repairs, check the engine for leaks, smoke, and unusual noise, test every drive mode (2WD, 4WD, and diff lock), and check the suspension, steering, brakes, tires, and electrical system. Take a test drive on mixed terrain, and verify the VIN, title, and service records before paying. Always compare the hours and mileage against the wear you see.How to Inspect a Used Honda Pioneer Before BuyingQ: How many hours is too many on a used Honda Pioneer?
A: There’s no hard cutoff. A well-maintained Pioneer can run for many hundreds of hours, so condition and service history matter more than the number alone.Q: Is a used Honda Pioneer a good buy?
A: Generally yes. Hondas have a strong reputation for reliability and resale value, but a used unit can hide hard use, so inspect it carefully.
Want a head start? Browse the current used Honda Pioneer for sale listings and use the checklist below on each one.
Why a Proper Inspection Matters
Let’s be honest: a side by side can look great in photos and still be hiding a thousand-dollar problem. A fresh wash and a shiny set of tires can cover up a lot.
Honda’s Pioneer lineup has earned its reputation. The Pioneer 500, 700, and 1000 series are known for dependable engines, comfortable rides, and solid build quality. That reputation is exactly why they hold their value, and why some sellers price them optimistically. A used Honda Pioneer is a smart buy, but only if you know what you’re looking at.How to Inspect a Used Honda Pioneer Before Buying
A thorough inspection does three things for you:
- Protects your wallet. Catching a bad CV joint or a leaking seal before you buy gives you real negotiating power, or a reason to walk away.
- Protects your safety. Brakes, steering, and the roll cage are not places to gamble.
- Tells you the real story. Wear patterns reveal whether the machine was a weekend trail cruiser or a daily-driven work truck.
Think of the next sections as the same list a good mechanic would run through.
Before You Go: Do Your Homework
The best inspection starts before you ever see the machine.
Know Which Pioneer Model You Want
The Honda Pioneer family covers several sizes and uses:
- Pioneer 500: compact and nimble, great for tight trails and light property work.
- Pioneer 700 (including the 4-seat version): the all-rounder. The single-cylinder engine is simple and proven, which makes a used Honda Pioneer 700 a favorite among farmers, hunters, and families.How to Inspect a Used Honda Pioneer Before Buying
- Pioneer 1000 (including the 1000-5): more power, more comfort, and available dual-clutch automatic transmissions. Used Honda Pioneer 1000 models are popular with people who want performance and room for passengers.
Knowing which one fits your needs keeps you from falling for a deal on the wrong machine.
Ask the Seller These Questions First
Before driving out, ask by phone or message:
- How many hours and miles are on the machine?
- How was it used (trail, farm, hunting, plowing, towing)?
- Is the title clean and in the seller’s name?
- Are there service records?
- Has it ever been in a rollover, submerged, or repaired after a crash?
- Any known issues or aftermarket modifications?
Vague answers are an early warning sign. A seller who knows the machine well usually has quick, specific answers.
Set a Realistic Budget
Price depends on year, trim, hours, and condition. Keep a cushion of a few hundred dollars for fluids, filters, a battery, or tires. If you’re comparing options, our full selection of used utility vehicles lets you see how similar machines are priced.How to Inspect a Used Honda Pioneer Before Buying
Tools to Bring
You don’t need a full shop, but a few items make a big difference:
- A bright flashlight (even in daylight)
- Clean rags or paper towels
- A tire pressure gauge and tread depth gauge
- A basic multimeter or battery tester
- Gloves
- A phone to photograph the VIN, hour meter, and any damage
- A friend (a second pair of eyes catches what you miss)
Step 1: Walk-Around and Frame Check
Start with the big picture before you dig into details.
Look at the Overall Condition
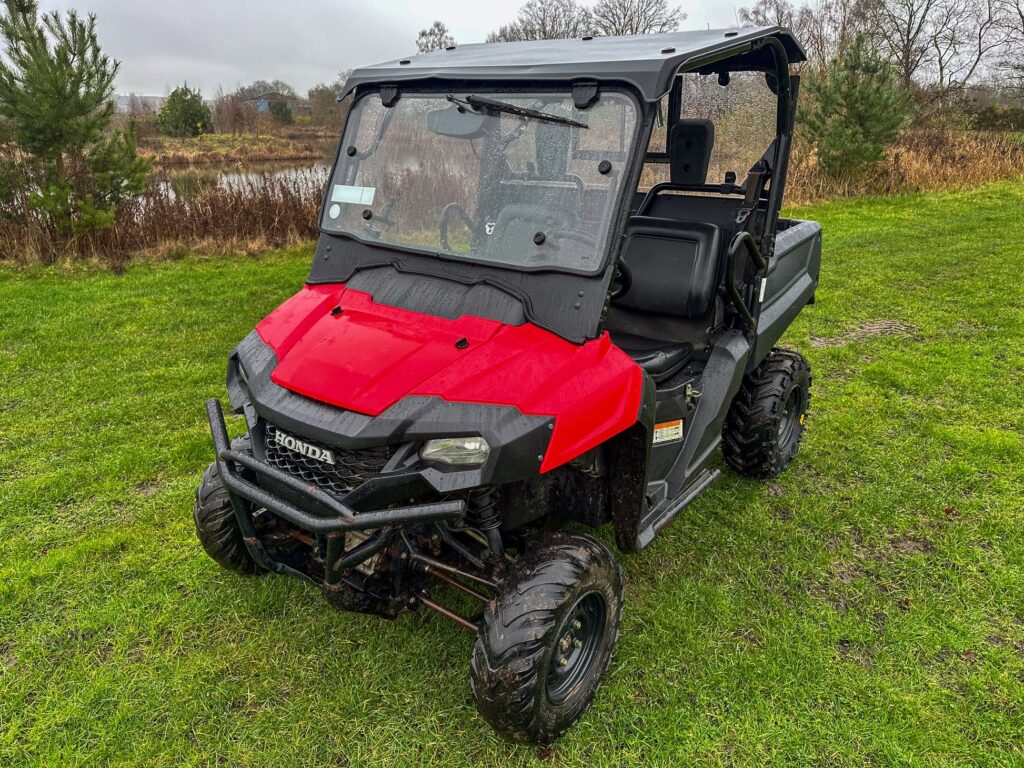
Walk around the machine slowly. Does the wear match the claimed hours? Faded plastics are normal. But heavy scratches on skid plates, torn seats, and bent panels suggest hard use.
Inspect the Frame and Roll Cage
This is the most important part of any used side by side inspection.
- Look for cracks, bends, and fresh welds. Fresh paint on one section of the frame can hide repairs.
- Check mounting points for the suspension, engine, and cargo bed.
- Inspect the roll cage (ROPS) for dents, rust, or rubbing damage. A cage that has been bent or repaired is a major red flag.
- Check that the body panels line up. Uneven gaps can point to a previous accident.How to Inspect a Used Honda Pioneer Before Buying
What About Surface Rust?
Light surface rust on bolts and exposed metal is normal for any machine that’s worked outdoors. Deep, flaking rust on the frame is not.
Look Underneath
Get down and look under the machine with your flashlight. Check for:
- Fresh oil, coolant, or grease drips
- Dented or cracked skid plates
- Bent control arms
- Torn CV boots (grease splattered around the axle is the giveaway)
Step 2: Engine and Fluids
A Honda engine tends to forgive neglect, but it won’t last forever if it’s been abused.
Do a Cold Start
Ask the seller not to warm up the machine before you arrive. A cold start reveals problems that a warm engine can hide:
- Hard starting
- Rough idle or stalling
- Blue or white smoke from the exhaust
- Ticking, knocking, or rattling sounds
Check the Oil
Pull the dipstick or check the sight glass.
- Golden or dark brown oil is normal.
- Milky or foamy oil can indicate coolant mixing in, a serious problem.
- Metallic glitter suggests internal wear.
- Very low oil means the owner was careless about maintenance.
Check the Coolant
Look at the coolant reservoir and radiator (only open the radiator when the engine is cold). Coolant should be clean and at the right level. Rusty or oily coolant is a bad sign.How to Inspect a Used Honda Pioneer Before Buying
Check the Air Filter and Intake
Open the airbox. A clean filter suggests careful ownership. A filter packed with dirt, or dust inside the intake, means the engine may have ingested contaminants.How to Inspect a Used Honda Pioneer Before Buying
Look for Leaks
Check around the valve cover, oil pan, water pump, and radiator hoses. Small seepage on an older machine can be acceptable. Active dripping is not.
Check the Belt Area (If Applicable)
Depending on the model, inspect the drive system for glazed, cracked, or burnt components. Burnt smells near the clutch cover suggest heavy abuse.
Step 3: Drivetrain, Transmission, and 4WD
The drivetrain is where costly repairs hide, so don’t rush this step.
Test Every Drive Mode
Engage each setting the machine offers:
- 2WD and 4WD: the switch should engage smoothly, with no grinding or warning lights.
- Differential lock: it should lock and release cleanly.
- Reverse: it should engage without clunking.
Check the Transmission Behavior
On automatic and dual-clutch models, watch for harsh shifts, hesitation, slipping, or jerking during acceleration. A used Honda Pioneer 1000 with a dual-clutch transmission should shift crisply and predictably. Ask whether the transmission fluid has been changed on schedule.
Inspect the CV Axles and Boots
Grab each axle and check for play. Look at the rubber boots for tears. A torn boot lets in dirt and wrecks the joint, and replacing axles adds up fast.How to Inspect a Used Honda Pioneer Before Buying
Listen for Noises
Clicking when turning often means worn CV joints. A whining noise from the front or rear differential suggests worn gears or low fluid. Humming that changes with speed can point to bad bearings.
Step 4: Suspension, Steering, and Brakes
These systems affect both comfort and safety.
Suspension
- Press down on each corner and release. The machine should rebound once and settle. Bouncing repeatedly means worn shocks.
- Check shocks for oil leaks. A wet or oily shock body is a bad sign.
- Inspect A-arms and bushings for cracks, bends, and sloppy movement.
- Check ball joints by lifting each wheel (if possible) and wiggling it top to bottom.
Steering
Turn the wheel lock to lock with the machine on the ground. It should feel smooth, without notchy spots. Check tie rod ends and the steering rack for play. On models with electric power steering, make sure the assist works at idle.How to Inspect a Used Honda Pioneer Before Buying
Brakes
- Check pad thickness through the caliper opening.
- Look at the rotors for deep grooves, warping, or heavy rust.
- Press the pedal. It should feel firm, not spongy.
- Check brake fluid level and color. Dark, dirty fluid means it’s overdue for service.
Don’t be shy about asking for a price reduction if the brakes need immediate work. It’s a legitimate negotiating point.How to Inspect a Used Honda Pioneer Before Buying
Step 5: Tires, Wheels, and Bearings
Tires
Tires tell you a lot about how the machine was cared for.
- Even wear on all four tires is a good sign.
- Uneven or cupped wear points to alignment or suspension problems.
- Mismatched brands may mean the owner replaced tires one at a time on a budget.
- Dry rot and cracks in the sidewall mean the tires are old even if the tread looks fine.
A fresh set of quality tires can run several hundred dollars, so factor that in.How to Inspect a Used Honda Pioneer Before Buying
Wheels
Look for bends, dents, and cracks, especially on the inner lip of the rim.
Wheel Bearings
With each wheel off the ground, grab it at the top and bottom and rock it. Any clunking or play points to a worn bearing. Spin each wheel and listen for grinding.How to Inspect a Used Honda Pioneer Before Buying
Step 6: Electrical System and Accessories
Electrical gremlins are annoying and sometimes expensive to chase.
Battery and Charging
Test the battery voltage. A healthy battery reads roughly 12.6 volts at rest and higher with the engine running. Check the terminals for corrosion.How to Inspect a Used Honda Pioneer Before Buying
Lights and Gauges
Test everything:
- Headlights (low and high beam)
- Taillights and brake lights
- Turn signals and hazards (if equipped)
- The dash, hour meter, and warning lights
- The horn and any accessory switches
Aftermarket Add-Ons
Winches, light bars, stereos, and heaters are common on used units. Poorly done wiring (twisted wires, electrical tape, mystery fuses) can cause trouble later. If the machine has accessories, check that they work and that the wiring looks clean and professional.How to Inspect a Used Honda Pioneer Before Buying
Step 7: Cab, Seats, and Safety Gear
Seats and Interior
Check for tears, sagging foam, and water stains. A musty smell or damp carpet can suggest the machine has been left uncovered or even submerged.
Seat Belts and Latches
Pull on each belt and make sure it retracts and latches properly. Check doors, nets, and latches, too.How to Inspect a Used Honda Pioneer Before Buying
Cargo Bed and Dump Function
Operate the bed lift if equipped. Look for cracks in the bed and make sure the latch holds. A bed that’s been overloaded often shows stress near the hinges and mounts.
Hour Meter and Wear Check
Compare the cabin wear with the hours shown. Pedals worn smooth and a shiny steering wheel on a machine with “low hours” don’t add up. If something seems off, ask the seller directly.
The Test Drive
You’d never buy a car without driving it. A used UTV deserves the same respect.
What to Do on the Drive
- Warm up gradually, then accelerate firmly to feel for hesitation.
- Drive on mixed surfaces: pavement, gravel, grass, and a gentle slope if possible.
- Brake hard (safely) from a moderate speed and check for pulling or pulsing.
- Make tight turns in both directions to listen for clicks and clunks.
- Engage 4WD and make sure it pulls properly.
- Climb and descend a small hill to test the transmission and engine braking.
- Watch the temperature gauge for overheating.
Pay Attention to the Feel
A good used Honda Pioneer feels tight and predictable. Rattles, vibrations, wandering steering, and unusual smells are all information. After the drive, park it and check underneath again for new leaks, then shut it off and see if it restarts easily when hot.
Paperwork and Ownership History
Even a perfect machine can become a headache with bad paperwork.
Check the VIN
Find the 17-character VIN on the frame and compare it to the title and any other documents. They must match exactly. Look for signs of tampering or stickers placed over the number.
Verify the Title
Confirm that:
- The title is in the seller’s name
- There are no liens (or the seller provides a lien release)
- It isn’t branded as salvage or rebuilt without your knowledge
Rules vary by state, so check your local DMV requirements for registering and titling an off-road vehicle.
Ask for Service Records
Receipts for oil changes, filters, and repairs are valuable. They prove the owner took care of the machine. A seller with full records often deserves a slightly higher price.
Get a Bill of Sale
Write down the price, date, VIN, and both parties’ information. Keep a copy.
Red Flags That Should Make You Walk Away
Some problems are fixable. These usually aren’t worth the risk:
- Cracked or welded frame sections
- Bent roll cage
- Milky engine oil
- Mismatched VIN or missing title
- Signs of flood damage (silt in the airbox, musty smell, corroded wiring)
- Seller refuses a test drive or won’t let you start it cold
- Pressure to buy immediately
- A price that’s far below market value with no good explanation
Trust your gut. There’s always another machine.
Where to Find a Reliable Used Honda Pioneer
Buying from a dedicated dealer is often less stressful than a private sale because you can see the machine, ask questions, and get clear documentation. If you’re ready to start shopping, explore our used Honda Pioneer UTV for sale page to compare available units. Not sure the Pioneer is the right fit? Our complete shop of used UTVs and utility vehicles has plenty of other options to consider.
Ready to find your next machine? Browse used Honda Pioneers now or see everything in our shop and get one step closer to the trail.
Frequently Asked Questions (FAQs)
How much should I pay for a used Honda Pioneer?
Price depends on the model, year, hours, and condition. A Pioneer 500 will cost less than a 1000-series with premium features. Compare several similar listings, then adjust for condition, accessories, and service history.
What are the common problems with used Honda Pioneers?
Honda Pioneers are generally reliable, but items worth checking include worn CV boots and axles, brake wear, suspension bushings, battery health, and fluid condition on machines used heavily for work or towing. Every machine is different, so inspect the actual unit.
How many hours is a lot for a used Honda Pioneer?
There’s no universal number. A machine with moderate hours and thorough maintenance can be a better buy than a low-hour unit that sat neglected. Use the hour meter together with wear patterns and records.
Should I get a mechanic to inspect it?
If you’re not confident with mechanical work, yes. A professional inspection costs far less than a major repair. It’s especially wise for higher-priced machines like a used Honda Pioneer 1000.
Is it safe to buy a used Honda Pioneer from a private seller?
It can be, if you verify the title and VIN, inspect the machine thoroughly, and meet in a safe location. Buying from an established dealer adds another layer of confidence.
Can I finance a used Honda Pioneer?
Many lenders offer financing for powersports and utility vehicles, and terms vary. Check with your bank, credit union, or the seller about available options.
What’s the difference between the Pioneer 700 and the Pioneer 1000?
The 700 uses a simpler, proven single-cylinder engine and is popular for utility work. The 1000 offers more power, available automatic transmission options, and a more refined ride, usually at a higher price.
Does a used Honda Pioneer come with a warranty?
It depends on the seller and the machine’s age. Factory coverage on older units has typically expired, so ask about any dealer or extended warranty.
What should I do right after buying?
Change the oil and filter, check all other fluids, inspect the air filter, and review the brakes and tires. Starting with a clean maintenance baseline helps you know exactly where you stand.
Final Thoughts
A used Honda Pioneer can serve you well for years, whether you’re hauling feed, hunting, plowing, or simply exploring the back roads. The difference between a great purchase and a regret is usually about an hour of careful inspection.
Check the frame first, listen to the engine on a cold start, test every drivetrain mode, and take a proper test drive. Verify the VIN and title, ask for records, and never let anyone rush you.
When you’re ready to shop, start with our used Honda Pioneer for sale inventory, or look through the full used utility vehicles shop to compare your options. The right machine is out there, and now you know how to spot it.